
Bokeh Effect: Ways to achieve background blur
What is Bokeh Effect?
Bokeh is a photography effect that creates a pleasing out-of-focus background, making the subject stand out. The term “bokeh” comes from the Japanese word “boke,” meaning “blur” or “haze.” This effect is often used in portrait photography to isolate the subject from the background.
Depth of Field
Depth of field (DoF) refers to the range of distance within a photo that appears acceptably sharp. A shallow depth of field means that only a small portion of the image is in focus, while the rest is blurred. This is often used to create a bokeh effect, where the background is artistically blurred to highlight the subject.
Shallow Depth of Field
 Photo by Gijs Coolen on Unsplash
In this photo, the depth of field is shallow. As a result only our subject (cat) is in focus while the rest of the image is out-of-focus
Deep Depth of Field
 Photo by Kalen Emsley on Unsplash
In this photo, the depth of field is deep. As a result, both the subject (mountain) and the background (water) are in focus.
Understanding the Physics behind Depth of Field
Before getting into the options we have to manipulate depth of field we need to understand the physics behind depth of field. This section is going to be theoretical. Feel free to skip this section if you are not interested in the theoritical aspects. I strongly recommend reading this section as it will help you understand the practical ways to achieve bokeh effect better.
Terminology
Circle of Confusion
In photography, the Circle of Confusion (CoC) is the maximum diameter of a blur spot on a camera sensor that the human eye will still perceive as a single sharp point in a final image.
A lens can only perfectly focus light from a single distance onto the sensor.
- Focal Plane: Light from the exact distance you focus on hits the sensor as a nearly perfect point, appearing “critically sharp”.
- Out of Focus: Light from objects in front of or behind this plane spreads out into a cone, hitting the sensor as a small disk instead of a point.
- Acceptable Blur: As long as this disk (the blur spot) remains smaller than the CoC limit, our eyes cannot distinguish it from a point, and the area appears to be in focus.

Standard values for Circle of Confusion based on sensor size:
| Sensor Size | Circle of Confusion (Zeiss Formula) |
|---|---|
| Full Frame (35mm) | 0.029 mm |
| APS-C | 0.020 mm |
| Micro Four Thirds | 0.014 mm |
Zeiss Formula:
where:
c= Circle of Confusiond= diagonal size of the camera sensor in mm
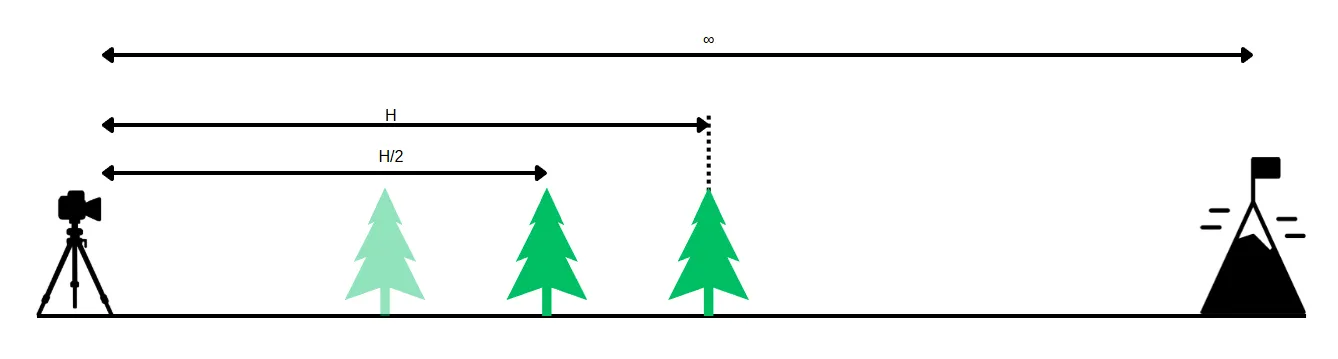
Hyperfocal Distance
Hyperfocal distance is the closest distance at which a lens can be focused while keeping objects at infinity acceptably sharp. When the lens is focused at this distance, everything from half of this distance to infinity will be in focus.
This technique is particularly valuable for landscape photographers who want to maximize depth of field and ensure both foreground and background elements remain sharp in a single shot.
Example: If the hyperfocal distance is 10 meters, and you focus your lens at 10 meters, everything from 5 meters to infinity will be in focus.
To find out the hyperfocal distance for your lens, you can use the following formula:
Where:
H= Hyperfocal distancef= Focal length of the lensN= Aperture f-numberc= Circle of confusion (a measure of how much a point source is blurred)
Example Calculation:
For a 50mm lens at f/1.8 with a circle of confusion of 0.03mm (standard for full-frame sensors):
Hyperfocal Distance Calculator
Calculate the hyperfocal distance for your lens setup:
Near and Far Focus Limits
When you focus your lens at the hyperfocal distance H:
- Near Limit: H/2 (half the hyperfocal distance)
- Far Limit: ∞ (infinity)
For any other focus distance s, the near and far focus limits can be calculated as follows:
These formulas are essential for precision work like focus stacking or when you need to know exactly where your sharp zone begins and ends, rather than just the total depth of field.
- Near Limit (D_N): The closest sharp point.
- Far Limit (D_F): The farthest sharp point. Where:
s= Distance to the subject (focus distance)f= Focal length of the lensH= Hyperfocal distance
Example Calculation: For a subject distance of 5 meters (5000mm) with H = 46296.3mm:
This gives us a depth of field from 4.5m to 5.6m when focusing at 5 meters - useful for knowing exactly what will be sharp in your composition.
Near & Far Focus Limits Calculator
Calculate the exact boundaries of your depth of field:
Depth of Field (DoF) The total DoF is the difference between these two limits:
Depth of Field Formula
This standard formula provides quick approximations for general photography and is particularly useful when planning portrait or landscape shots where you need to estimate the total depth of field.
The depth of field can be calculated using the following formula:
Where:
DoF= Depth of FieldN= Aperture f-numberc= Circle of confusions= Subject distance (focus distance)f= Focal length of the lens
Example Calculation: For a 50mm lens at f/2.8, focusing at 3 meters with CoC = 0.029mm:
Depth of Field Calculator
Calculate the total depth of field using the standard formula:
Practical Ways to Achieve Bokeh Effect
-
Use a Wide Aperture: A wide aperture (low f-number) allows more light to enter the lens, creating a shallow depth of field. This results in a blurred background while keeping the subject in focus. Lenses with apertures like f/1.8 or f/2.8 are ideal for achieving bokeh.
-
Increase Distance Between Subject and Background: The greater the distance between your subject and the background, the more pronounced the bokeh effect will be. Position your subject further away from the background to enhance the blur.
-
Use a Longer Focal Length: Telephoto lenses (e.g., 85mm, 100mm, or longer) compress the background and create a more pronounced bokeh effect. Using a longer focal length can help isolate the subject and blur the background effectively.
-
Get Closer to Your Subject: The closer you are to your subject, the shallower the depth of field will be. This can help in achieving a stronger bokeh effect.
-
Choose a Suitable Background: A background with lights or patterns can enhance the bokeh effect. Points of light in the background will create beautiful bokeh circles when out of focus.
Conclusion
Achieving the bokeh effect in photography involves a combination of using a wide aperture, increasing the distance between the subject and background, utilizing longer focal lengths, getting closer to the subject, and selecting a suitable background. Experimenting with these techniques can help you create stunning images with a pleasing bokeh effect.
The interactive calculators throughout this article help you apply the theoretical concepts to your specific camera setup and shooting scenarios.